


Administrators can now check in event attendees by scanning QR codes using either a phone or tablet camera or using a dedicated QR code scanner.
Add QR Code To Event Registration Confirmation Emails
To begin, you will need to provide the QR code to your event registrants with the event confirmation email. From the event’s “Advanced” settings tab, add the [qec] tag to the confirmation email template (don’t forget to click Save to save the changes).
Using A Phone Or Tablet Camera To Scan QR Codes
Open your phone or tablet camera app and point it steadily at the QR code. If your app recognizes the QR code a notification/link should appear. Click on the link to open up the MembershipWorks admin console to check in the attendee.
Note 1: If you are not already signed in (as an administrator) you will be required to sign in first.
Note 2: When the registration information is retrieved, take note of the event title/date displayed in the first box and make sure it matches your current event. The QR code link may belong to other events. You can click the “Undo Check In” button if the wrong event QR code is scanned.
Note 3: Certain Android devices may not support QR code scanning with the native camera app, in that case you may need to download a third-party QR code reader app.
Using A Dedicated QR Code Scanner Device
To use a dedicated QR code scanner, first connect the QR code scanner to your device. Then login to the MembershipWorks admin console (https://membershipworks.com/admin/) and navigate to the event’s dashboard. Click on “Scan QR Code” to put the console in scanning mode.
Note: You need to keep the MembershipWorks admin console window active/focused. If you click to other windows or applications, the QR code scanner will send the data to that window/application instead.
When an event check in QR code is recognized, MembershipWorks will check in the attendee and display the corresponding registration information. You can scan the next QR code without closing the dialog to continue checking in the next attendee.
The following connection information is for the ScanAvenger QR Code Scanner which we have tested. You can use other USB or Bluetooth scanners, please refer to their documentation on how to connect the scanner to your device – we are unable to provide any documentation or help on how to connect other scanners.
Wired USB Connection
Use a USB data cable to connect the scanner to your device. The scanner will be recognized as a keyboard device. If using a Mac, the Keyboard Setup Assistant will be launched when you connect the scanner the first time.

When prompted to click on the key to the right of the left SHIFT key. Scan the following QR code:

When prompted to click on the key to the left of the right SHIFT key scan the following QR code:

If an issue occurs and the Keyboard Setup Assistant is still unable to identify the device, select the “ANSI” keyboard when prompted.
Bluetooth Connection
Locate the plastic card titled “Bluetooth Troubleshooting” provided with the scanner. Note that the cards are double sided so check both sides of each card.
Cover the 2nd QR code on the card with your hand and use the scanner to scan the 1st QR code. If you are connecting this scanner to the device for the first time, proceed to cover the 1st QR code and scan the 2nd QR code. The scanner LED light should start blinking blue to indicate it is in Bluetooth pairing mode.
On your device, open your Bluetooth settings and connect to the “ScanAvenger HID” device. Once connected the scanner is ready to use.
Note that if the scanner is unused for some period of time, it will turn off and disconnect from the device (a loud beep will trigger when it turns off).
Check In Process
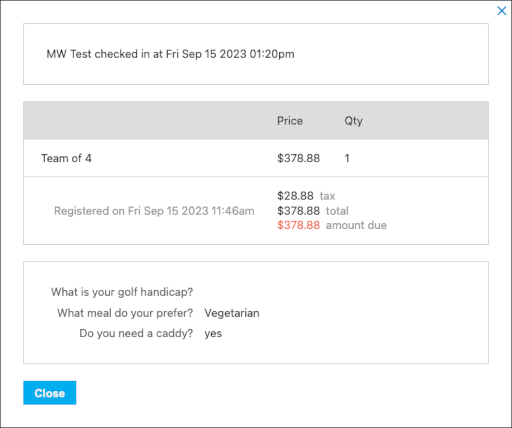
Once the QR code has been scanned, MembershipWorks will check in the registrant and display a dialog showing the registration information.
If you are using the event dashboard QR code scanning mode with a dedicated QR code scanner device, you can continue to scan the next QR code without closing the dialog.
If you are using your phone/tablet camera to open a QR code link, confirm that the event title/date shown in the first box matches your current event – the QR code could be for a different event. When you are using the event dashboard QR code scanning mode (with a dedicated scanner device), MembershipWorks will display an error if the QR code does not match the current event dashboard.
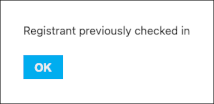
If the registrant had previously checked in, a warning dialog will appear so you can prevent multiple persons from checking in using a single QR code.
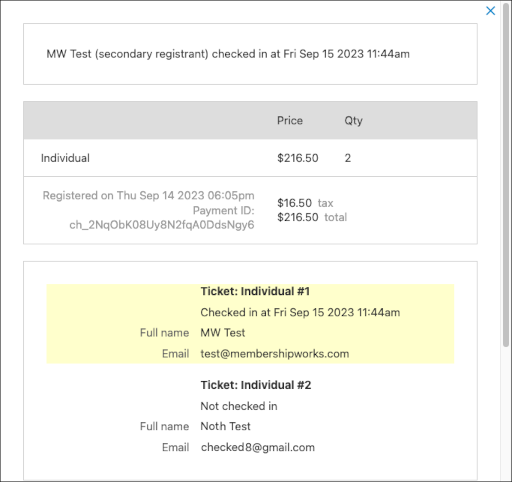
If the QR code corresponds to a secondary registrant, the check in information displayed in the first box will indicate that it is a secondary registrant and the corresponding secondary registrant’s information will be highlighted.
Note that to send a QR code to secondary registrants, you need to:
- Add email address as a question under the event ticket’s setting on the Questions tab
- Enable “send confirmation email to all attendees” under the event’s Ticketing settings tab
- Add [qec] tag to the event confirmation email under the event’s Advanced settings tab
If you have multiple admins/devices checking in people at an event, the event dashboard should be refreshed (by clicking the Refresh button on the dashboard) to load up-to-date checkin information for all attendees.
Comments are closed.