


Admins and members can now upload files to member accounts. The system will allow up to five files per account and accepts a variety of file types including image files, PDFs, zipped files and documents. Each file can have a maximum size of up to 5 MB.
How to Use This Feature
- Member Application Process
- Sharing Files from the Organization with the Member
- Members Share Files on Their Directory Profiles
Member Application Process
Organizations with an application screening process can require that applicants upload documents such as certificates and licenses prior to becoming an approved member. If you’d like to set up an approval process for new members you can get step-by-step instructions here in the “Creating Membership Levels” section under “Creating a Process For Approving New Members.”
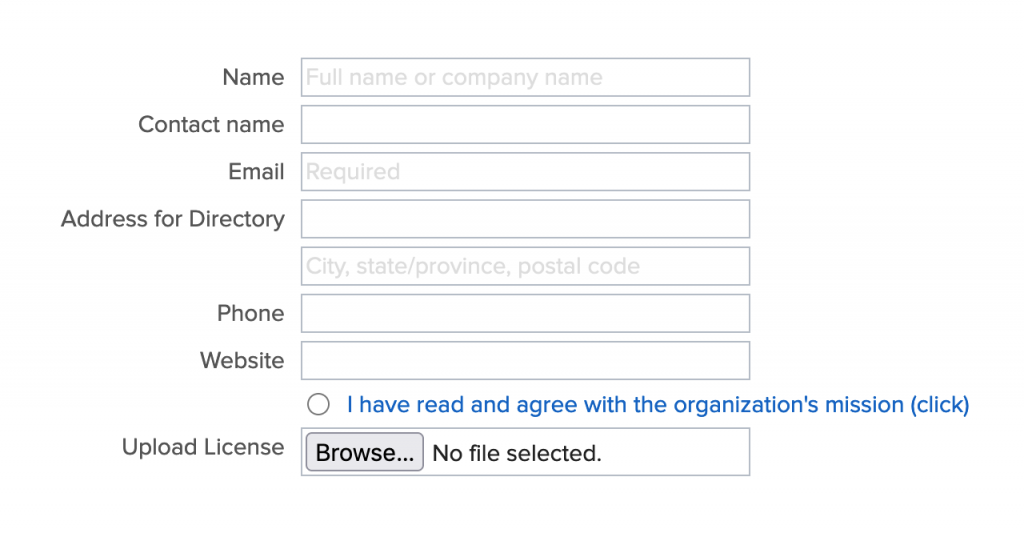
To add the ability for members to upload files when they join:
- Go to Customization > Member Sign-Up
- If you want this section to have its own box, scroll down to an area where you can click on “+ Add Box”. Or if you want this field to appear on the first page of the Join form as shown above, skip to step 5.
- The “Box type” should be “Custom Form”; you may optionally add a Title and/or Description
- Click “OK”
- Click on “+ Add Field”
- In the “Field” dropdown list, choose “File 1” or another one of the File choices. Note that once you use a numbered file field like “File 1” for one type of task (such as a license upload), you should choose another file number field like “File 2” for other tasks (such as a continuing education certificate) so that the file uploads don’t overwrite each other.
- Type a Description and edit the “Required” field if desired
- Click “OK”
- Click “Save Template”
- Repeat the above steps in Customization > Admin Profile so administrators can see what members have uploaded to their profile
Sharing Files from the Organization with the Member
Administrators can upload continuing education certificates or other files to member accounts for members to view or download from their profile after logging in.
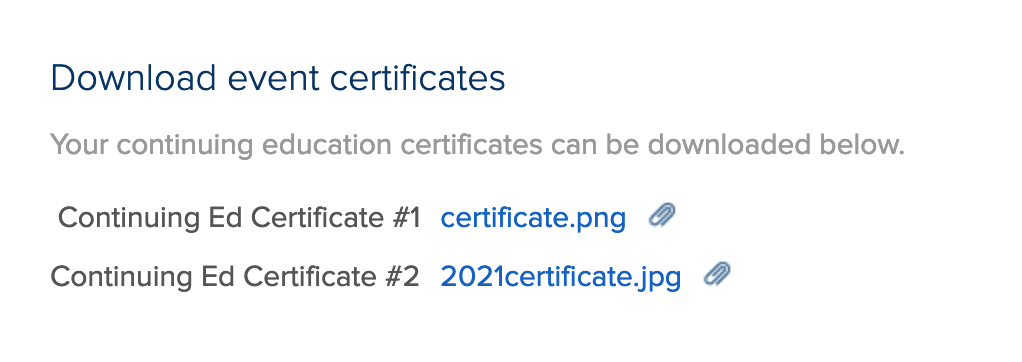
To add fields so that your administrators can upload files for your members to access in their profiles:
- Go to Customization > Admin Profile
- If you want the section to have its own box, scroll down to an area where you can click on “+ Add Box”. If you want this field to appear in the top section of the Admin Profile, skip to step 5.
- The “Box type” should be “Custom Form”; you may optionally add a Title and/or Description
- Click “OK”
- Click on “+ Add Field”
- In the “Field” dropdown list, choose “File 1” or another one of the File choices. Note that once you use a numbered file field like “File 1” for one type of task (such as a continuing education certificate upload), you should choose another file number field like “File 2” for other tasks (such as a allowing members to add file downloads to their directory profiles) so that the uploads don’t overwrite each other.
- Type a Description and edit the “Required” field if desired
- Click “OK”
- Click “Save Template”
To allow members to login and download these files:
- Go to Customization > Member Manage
- Scroll down to an area where you can click on “+ Add Box”
- The “Box type” should be “Custom Form”; you may optionally add a Title and/or Description
- Click “OK”
- Click on “+ Add Field”
- In the “Field” dropdown list, choose the same file field you choose in the prior set of instructions (e.g. “File 1”)
- Type a Description and edit the “Required” field if desired
- Click “OK”
- Click “Save Template”
Admins can also add documents that are only available to other admins. This would be done by adding the file fields to just the Admin Profile template. If you need a refresher on customizing the Member Sign-Up, Member Manage and Admin Profile templates, you can read our quick start guide here.
Members Share Files on Their Directory Profiles
Members can login and upload files to make them available on their Directory Profile for directory visitors to see and download.
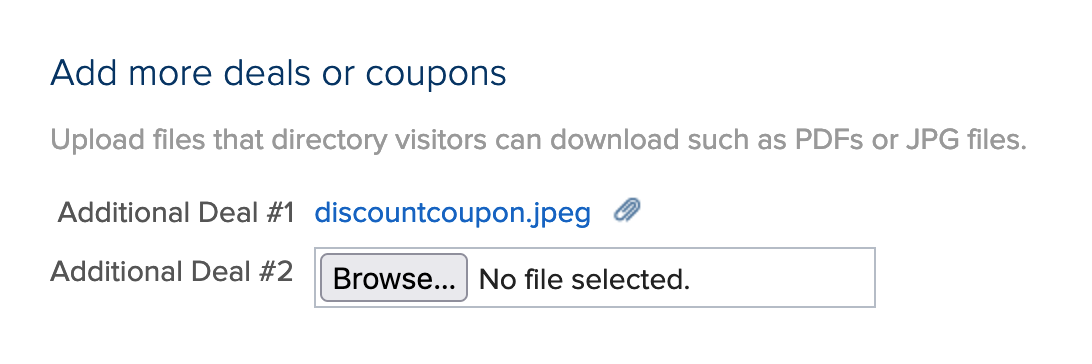
To allow members to add files to their Directory Profile:
- Go to Customization > Member Manage
- Scroll down to an area where you can click on “+ Add Box”
- The “Box type” should be “Custom Form”; you may optionally add a Title and/or Description
- Click “OK”
- Click on “+ Add Field”
- In the “Field” dropdown list, choose a file number (e.g. “File 1”). Note that once you use a numbered file field like “File 1” for one type of task (such as allowing members to add file downloads to their directory profiles), you should choose another file number field like “File 2” for other tasks (like enabling admins to upload a continuing education certificate) so that the uploads don’t overwrite each other.
- Type a Description and edit the “Required” field if desired
- Click “OK”
- Click “Save Template”
- Repeat steps 2-9 in Customization > Admin Profile so administrators can see what members have uploaded to their profile
To add the file downloads to the Directory Profile template:
For additional help on customizing the Directory Profile, see Help > Customization > Directory Profile Template.
- Go to Customization > Directory Profile
- Scroll down to an area where you can click on “+ Add Box”
- The “Box type” should be “Custom HTML”
- Using HTML, plug in your file tags and other text to provide context for the download. Note the numbering of files in the tags outlined below.
- Click “Save Template”
Sample:
Here is one example of HTML; it displays a headline as well as File 4 and File 5 with a single return in between them:
<h3>Download additional discounts!</h3>[f03]<br />[f04]
This displays as follows:

The tags for each file are as follows:
- [f00] – File 1 (link)
- [f01] – File 2 (link)
- [f02] – File 3 (link)
- [f03] – File 4 (link)
- [f04] – File 5 (link)
Please note that we do not provide support for custom HTML. If you require assistance with the HTML to display files, you will need to work with your developer. If you don’t have your own developer you can contact developers in our developer directory for quotes.
Important: Files that are uploaded to the system are not scanned for viruses or malware. Please use appropriate care when downloading or opening files.
Comments are closed.