• Home
  • Features
    • Membership Software
    • Member Directory
    • Event Calendar & Registration
    • Member Billing & Online Payments
    • Donations, Shopping Carts & Forms
    • Job Board
    • Announcement Board
    • Classified Ads
    • Members Only Website
    • Website Integration
      • WordPress
      • Squarespace
      • Weebly
      • Without Code
      • Duda
      • Wix
      • HTML5
    • Integrations
    • International
  • Sign Up
    • Pricing & Sign Up
  • Customers
    • Customer Sign In
    • Getting Started
      • MembershipWorks Hosted Website
      • WordPress Plugin
      • Squarespace
      • Weebly
      • Without Code
      • Wix
      • HTML5
    • Customer Websites
  • Developers
    • Find a Developer
    • Create a Developer Listing
    • Manage Developer Listing
  • Demo
    • WordPress Demo
    • Squarespace Demo
    • Weebly Demo
    • Without Code Demo
    • Duda Demo
    • Wix Demo
    • Video Demo of Admin
    • Schedule a Personal Demo
  • About
    • Contact Us
    • Cancel/Suspend Account
    • Schedule a Personal Demo
    • Schedule a Personal Training Session
    • Our Blogs
      • Guides
      • Best Practices
      • Secret Confessions of an ED
      • WordPress with the Light On
    • New Features
    • Careers
    • System Status
Schedule Demo

Discover our membership software with a one-on-one personalized demo:

Schedule a Demo
CMS Integrations

Integrate with WordPress, SquareSpace, Weebly and more.

Learn More!
MembershipWorkslogo

Printing Name Tags Using Export and Mail Merge

Posted on Jun 12, 2014 by MembershipWorksMar 18, 2020

The following instructions are for Microsoft Word 2013. The steps are similar but may be slightly different in older versions of Microsoft Word.

To begin, first export the names from your MembershipWorks folder or event dashboard. Then follow these steps to merge the exported spreadsheet to a Microsoft Word document for printing.
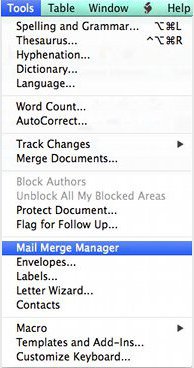
Step 1:

Open a new Word document and go to Tools > Mail Merge Manager. Once you’ve clicked on that it will open the Mail Merge Manager box.

choose-mail-merger-manager

Step 2:

Select Document Type click on Create New > Labels…
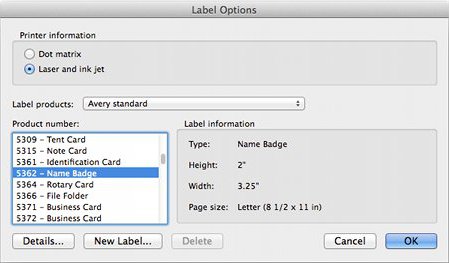
select-labels

Step 3:

Select the name badge size that matches what you want to print.
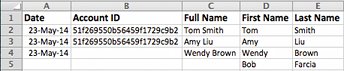
choose-name-tag-type

Step 4:

Check your spreadsheet and make sure your columns have the headings you plan to use.
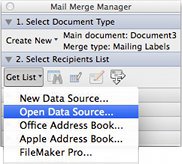
match-column-names-to-mail-merge-titles

Step 5:

In the Mail Merge Manager (Select Recipients List), click on Get List > Open Data Source…

open-data-source

Step 6:

Select the spreadsheet file that you are using for the mail merge.
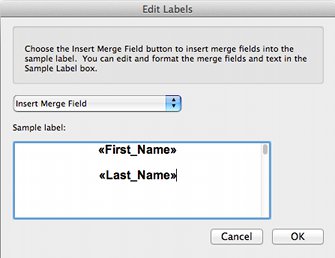
Step 7:

Choose the fields you would like merged. Here I’ve chosen First Name and Last name. Line them up the way you would like them to be on the name tag.
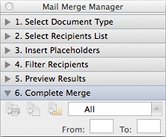
choose-your-fields

Step 8:

In the Mail Merge Manager (Complete Merge), choose Merge new document.

merge-new-document

Step 9:

Your new document can now be printed, saved or edited.

GoToOlder PostNewer PostAll PostsGuidesSecret Confessions of an ED

Comments are closed.

  • Home
  • Features
  • Sign Up
  • Customer Sign-In
  • Terms of Service / Privacy
  • Developers
  • Contact