• Home
  • Features
    • Membership Software
    • Member Directory
    • Event Calendar & Registration
    • Member Billing & Online Payments
    • Donations, Shopping Carts & Forms
    • Job Board
    • Announcement Board
    • Classified Ads
    • Members Only Website
    • Website Integration
      • WordPress
      • Squarespace
      • Weebly
      • Without Code
      • Duda
      • Wix
      • HTML5
    • Integrations
    • International
  • Sign Up
    • Pricing & Sign Up
  • Customers
    • Customer Sign In
    • Getting Started
      • MembershipWorks Hosted Website
      • WordPress Plugin
      • Squarespace
      • Weebly
      • Without Code
      • Wix
      • HTML5
    • Customer Websites
  • Developers
    • Find a Developer
    • Create a Developer Listing
    • Manage Developer Listing
  • Demo
    • WordPress Demo
    • Squarespace Demo
    • Weebly Demo
    • Without Code Demo
    • Duda Demo
    • Wix Demo
    • Video Demo of Admin
    • Schedule a Personal Demo
  • About
    • Contact Us
    • Cancel/Suspend Account
    • Schedule a Personal Demo
    • Schedule a Personal Training Session
    • Our Blogs
      • Guides
      • Best Practices
      • Secret Confessions of an ED
      • WordPress with the Light On
    • New Features
    • Careers
    • System Status
Schedule Demo

Discover our membership software with a one-on-one personalized demo:

Schedule a Demo
CMS Integrations

Integrate with WordPress, SquareSpace, Weebly and more.

Learn More!
MembershipWorkslogo

Setup Paypal Website Payments Pro

Posted on Feb 28, 2013 by MembershipWorksMar 18, 2020
The information on this page may be out-of-date, please refer to our Help section for current information.

MembershipWorks integrates with Paypal for event and membership payments, tracking payments in the membership system and allowing transactions to happen right on your website so visitors never leave your web page, improving conversion rates. You will need a Paypal Website Payments Pro account. If you need automatic recurring billing for memberships you will also need to signup for Recurring Payments. Note that these services incur monthly fees with Paypal.

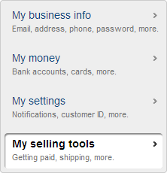
  1. After logging into your Paypal account, hover over More in the top toolbar and click on Settings. Then click on My Selling Tools.
    Paypal Selling Tools
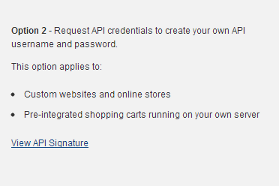
  2. Click on API access, then click the link in Option 2. Note down the API Username, API Password and Signature.
    Paypal API Access
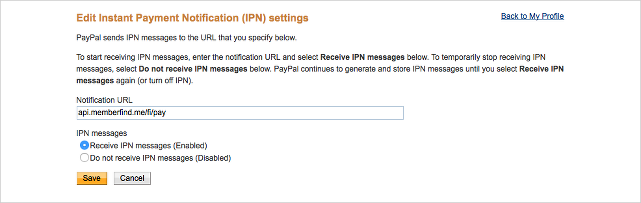
  3. Click “Back to My Profile” to return to the settings page. Next, click on Instant payment notifications. Click the Choose IPN Settings button. Enter “https://api.membershipworks.com/fi/pay” in the Notification URL, select Receive IPN messages (Enabled), then click Save.
    Paypal IPN Settings
  4. From MembershipWorks, go to Organization Settings > Integration > Payments and select Paypal Website Payments Pro as the Payment gateway, then enter the API Username, API Password, Signature, and click Save & Continue:
    paypal-setup
GoToOlder PostNewer PostAll PostsGuides

2 comments

  1. Vicki on Sep 5, 2013 at 7:30 pm
    Hi, The link to "Setup Domain and SSL" goes to your Custom Website and Hosting page, but there does not appear to be any information about setting up SSL on our own hosted sites. Do you have a link where I can find that information? Thanks so much! I am excited to get started using your membership management plugin. Vicki
    • Aikmeng Kuah on Sep 9, 2013 at 5:30 pm
      Unfortunately the process for setting up SSL will vary greatly depending on your hosting provider and your server type. The general process is: 1. Create a Certificate Signing Request (CSR) using your organization's name, location and the domain name that you need the SSL certificate for. Note that you need to specify the full domain name, including the "www" part if its supposed to be there, as the certificate will be issued specifically for that domain only. Creating the CSR will also generate a Private Key at the same time, which you will need to keep in order to install the certificate later. The CSR then needs to be provided to the company that is going to issue you the SSL certificate. 2. Once you receive the certificate you need to install it on your server. The interface to do so will vary depending on your hosting provider and server. If you have direct access to your server, here are instructions for the common server types: http://www.digicert.com/csr-creation.htm 3. Once you have the certificate installed, you can either enable SSL across your entire website (by changing the site and wordpress url settings), or you will need some way to enable SSL for specific pages. We build this feature into our themes, but there are free third-party plugins that do this in the WordPress plugin directory.

Comments are closed.

  • Home
  • Features
  • Sign Up
  • Customer Sign-In
  • Terms of Service / Privacy
  • Developers
  • Contact