


Whether you already have a Squarespace website or are planning to create your site there, adding a Squarespace member login isn’t hard. Follow this step-by-step guide to build a Squarespace membership site with ease and confidence.
For purposes of this setup guide, we won’t address building pages or web design in Squarespace. There are plenty of tutorials and abundant help documentation from this popular platform which currently boasts almost 3.1 million live sites internationally and 2.3 million sites in the United States. Building your pages is step one if you don’t already have a website.
Step 1: Choose a Squarespace Membership Plugin
If you ever decide to leave Squarespace for another hosted platform, a membership database that’s part of a separate plugin can travel with you to another membership website builder. Some organizations may want an alternative to Squarespace Member Areas as it doesn’t meet the needs of every type of business or nonprofit. To choose your Squarespace membership plugin, get clear about the features you need such as:
- Member billing and online payment
- Members only content
- Member directory
- Member and non-member event registration
- Accepting donations
- Shopping cart
- Online forms
Having fully-featured membership software enables you to leverage integrated features to your advantage and keep track of member activity across multiple areas of your site.
You’ll also want to consider price. With some membership plugins, you’ll incur:
- monthly fees,
- per-transaction fees as high as 7% and
- payment gateway fees.
Payment gateway fees and per transaction fees can exponentially eat into your revenue and make you less profitable. Carefully evaluate the fee structure to see what works best for your membership website.
Note that Squarespace membership plugins do not typically connect to Squarespace Member Areas. It’s definitely not a good idea to use Squarespace Member Areas and a membership plugin on your site at the same time. It could get confusing for both your members and anyone who is administering the membership site.
Step 2: Set Up Your Payment Gateway in Your Membership Plugin
 You might already have an account with Stripe, PayPal, Authorize.net or another payment gateway. Check with your membership plugin to see what payment processors they integrate with. You may want to take a look at the transaction fee schedule for each provider to make the right choice for your type of membership organization. Once you have your gateway account established, typically you’ll need to enter API information or keys into your membership software to tie the two together.
Step 3: Integrate with Your Squarespace Site
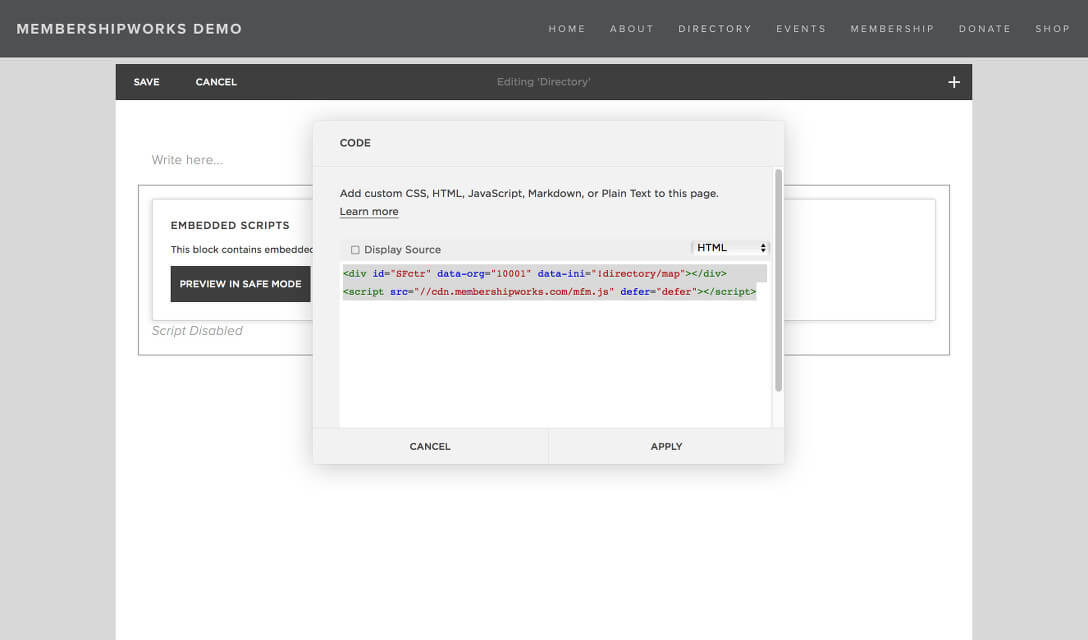
You’ll get more membership sign ups if your membership join form and other features reside on your site. You don’t want prospective members to be confused or not feel secure when they are taken to a separate site to complete their transaction. MembershipWorks offers a seamless way to add in landing pages for your:
- membership signup form,
- member login form,
- Squarespace members area,
- event calendar,
- member directory and more.
It’s as easy as copying and pasting HTML snippets (no coding needed) into a Code Block in Squarespace. Here’s how to add a member login to Squarespace. Follow these tips to optimize your prospective member experience:
- Put the member join form “above the fold” so one doesn’t have to scroll down to see it. Save lengthy explanatory text for another page.
- Don’t make members hunt to find dues prices.
- On pages where you are collecting money, don’t have videos, ads, repeating animations or other things that may make sound or motion that may cause the user to be distracted or annoyed.
Step 4: Set Up Your Membership Levels
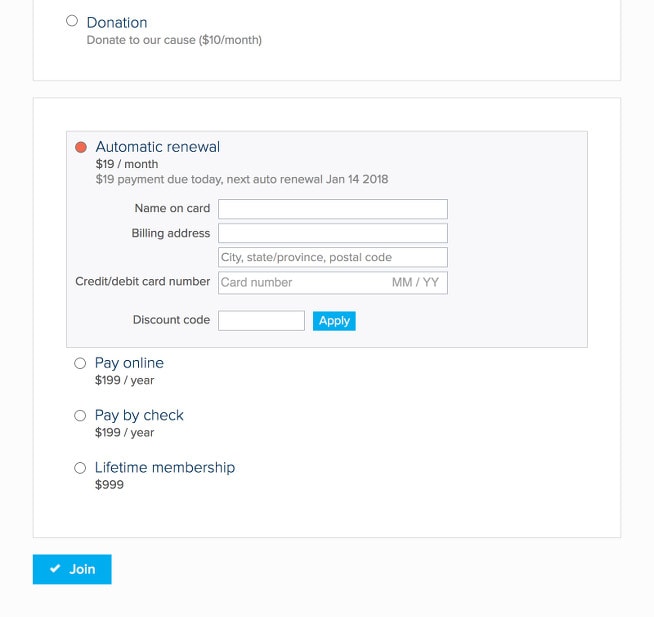
Many organizations offer different tiers or levels of membership. Enter each of these into your membership system and choose billing options to accompany your memberships. Consider if you want to:
- Set a free trial or set up discount codes for new or returning members
- Offer automatic recurring payments, monthly or annual payments and one time credit card payments. Some membership sites offer many options while others only offer auto recurring credit card payments to reduce the friction members experience when having to log in and pay again.
- Accept offline payment methods such as checks. Evaluate the demographics of your members when making these decisions. Some older members may hope that a check option is available.
The bottom line: offer easy-to-understand payment options that are clear about the commitment or term.
Finally you’ll want to set up renewal notices and welcome messages. Make sure you create a robust welcome letter that informs members of their member benefits; it can also include their login and password information. Renewal notices will remind members when it is time to renew and can also be set to send when a member goes past due. It’s always a good idea to customize the default system messages. For instance, don’t miss an opportunity to sell the value of the membership again when you send out renewal notices.
Step 5: Set Up Your Forms
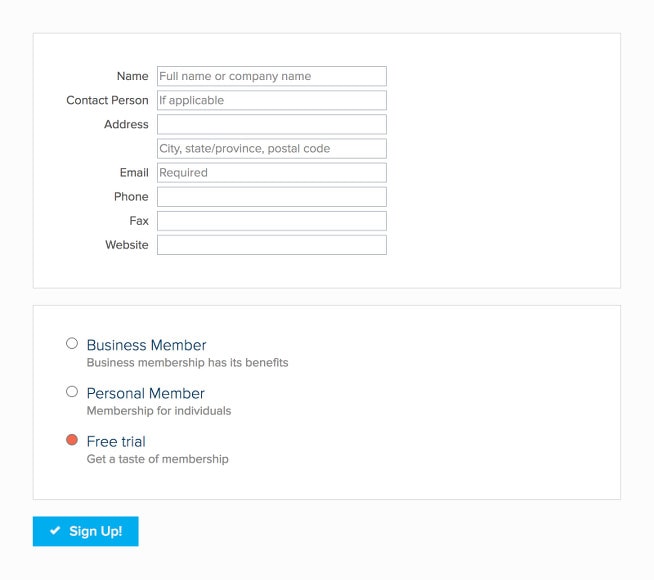 Your membership software will likely provide a default membership signup form, but you may want to adapt it to remove any fields that don’t apply or to add your own custom fields. Reduce the number of fields to an absolute minimum on your join page. One study showed that nearly 20% of users made it to checkout when a form had fewer than five fields. You can ask for more information later. In general, you’ll want to remove excess information from the page — the member has one job when they are here.
Members will also need a way to manage their profile. Their member manage form is what a typical member might see after logging into their profile. There, they should be able to edit their contact information, update their credit card details and see their payment history. You can also decide whether members should be able to and add additional users to their account.
Step 6: Categorize and Import Your Members
Your members can be categorized or tagged beyond their membership level. For instance, a membership site for a chamber of commerce might want to have a directory with various types of businesses listed such as restaurants, accommodations, attractions and more. Your membership plugin will allow you to tag, label or otherwise categorize these businesses. You may also want to make it possible for members to label themselves. Whether you tag your them for a public directory or label them for internal reasons such as a board of directors list, it’s a good idea to create labels for them before you import any existing members so that they can be imported with their label applied.
When it’s time to import your members, check your plugin’s help documentation for a sample spreadsheet. You may need to rename your columns to align with the names for the system fields. Don’t hesitate to ask for support during this process if you get stuck.
Step 7: Announce Your New Website
If you have existing members, you’ll want to spread the word about the new features that they can now enjoy. You should create a website announcement email that includes:
- A list of features they can enjoy on the your membership site
- Clear instructions on how to obtain their password to login
- A message of thanks for their membership
If you are just beginning to court members, you can use your email marketing platform to send out a message to prospects. If you have a LinkedIn group, Facebook group, social media channels or other way of communicating with prospects, be sure to reach out there as well. See these ideas for creative ways to announce your site and build membership enrollment.
Comments are closed.