


You can allow event registrants to make a membership payment at the same time as they register for an event. Please note although the payment will be classified as a membership payment you will still need to add or update the membership level and next renewal date to the account for each registrant – please read the section on Necessary Admin Followup for instructions.
Where to Setup Event Membership Payments
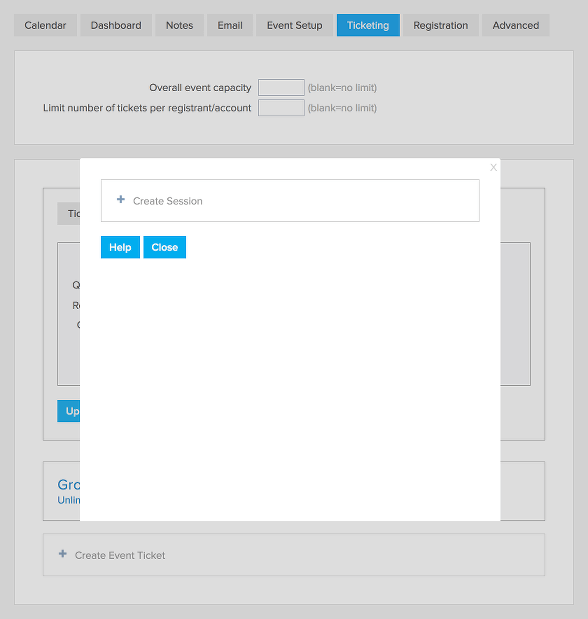
- Go to the “Ticketing” tab of the event
- Click on “Create Event Ticket” to create a ticket
- Select the “Questions / Sessions / Add-On” tab
- Click “Add question, session or add-on per ticket”
- Set the Type to “Select a Session or Add-On”
How to Setup Your Membership Payment Options
- Click “Setup Session / Add-Ons”
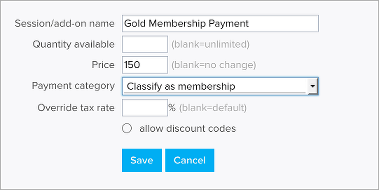
- Click “Create Session”
- Give your membership payment option a name, for example “Gold Membership Payment”
- Set a price to the membership payment option
- Set the “Payment category” to “Classify as membership”
- If you need to override the default tax rate you can set the percentage under “Override tax rate”. For example of you are charging a tax for the tickets but the membership is tax free you can set “Override tax rate” to “0”.
- If you’d like to allow discount codes you can enable that feature and then select the discount codes that you will accept for this membership payment. You will see that enabled discount codes will get a blue background after you click on them.
- Click “Save”
- Repeat for each membership payment option you’d like to offer.
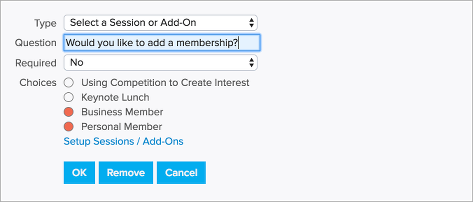
Once all of your membership payment options are created you can add a “Select a Session or Add-On” question and offer them as options for the question. For example you can create the question “Would you like to add a membership?” and then offer the different options you’ve set up. If the membership payment is optional, you should set “Required” as “No” for that question, that way registrants who do not wish to purchase a membership can skip the question.
Necessary Admin Follow-up
Although the payment will be classified as a membership payment it does not update the member’s membership level or their next renewal date. It also won’t create accounts for registrants that are not in your system. Follow the below steps to ensure the membership payment is correctly reflected in the member’s account.
Renewal Payments
- Go to the event’s “Dashboard” tab
- Click on the person icon next to the event registrant to pull up their account
- Locate the “Next Renewal Date” or “Membership Expired” entry and update it to reflect the new membership expiration date
- You may also want to put a note in the member’s timeline stating that they renewed when registering for an event
Upgrades and Downgrades
- Go to the event’s “Dashboard” tab
- Click on the person icon next to the event registrant to pull up their account
- Select the “Membership Billing” tab
- Click “Update”
- Select the new membership level
- Select “Manual billing”
- Click “Save”
- Select the “Timeline” tab
- Locate the “Next Renewal Date” or “Membership Expired” entry and update it to reflect the new membership expiration date. If there is no existing entry, click on “Create New Entry” to create a new “Next Renewal Date” entry for the membership expiration date.
- You may also want to put a note in the member’s timeline stating that they upgraded/downgraded when registering for an event
New Members
- Go to the event’s “Dashboard” tab
- Click on the “+” icon next to the event registrant
- Select the folder you would like their account added to
- Click “Create”
- A person icon should now appear next to the event registrant on the event dashboard, click on the icon to pull up the account
- Select the “Membership Billing” tab
- Click “Update”
- Select the correct membership level
- Select “Manual billing”
- Check the “Send new member welcome email” option if you’d like the member to be sent the welcome email set for this membership level
- Click “Save”
- Select the “Timeline” tab
- Click on “Create New Entry” to create a new “Next Renewal Date” entry for the membership expiration date.
- You may also want to put a note in the member’s timeline stating that they joined when registering for an event
How to Create a List of Membership Payments from the Event
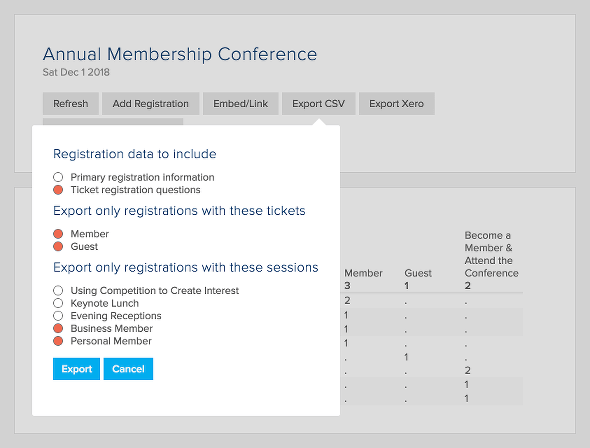
- Go to the “Dashboard” tab of the event
- Click “Export to CSV”
- Uncheck “Primary registration information”
- Check the membership payment options you are creating a list for
- Click “Export”
Event Confirmation Email
Collecting a membership payment when attendees register for an event does not trigger a separate membership receipt. If there is special information you need to include in the receipt you should add it to the event confirmation email.
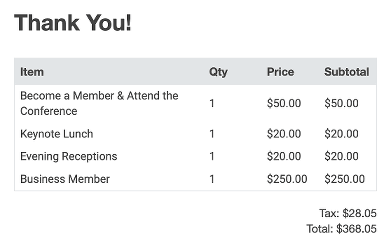
The [itemtable] tag can be used in the event confirmation email to provide a break down of the event registration charges by ticket, sessions and membership payments. In the example below 1 member ticket was purchased along with 1 keynote lunch session, 1 evening reception session, and 1 business membership payment.
To have the confirmation email include all the information associated with each ticket you can use the tag [tqn].

FAQs
- Membership payment options are set up separately on each event.
- The discount code is applied to each membership payment option included in the registration. For example if you set up a $10 discount code for Gold Membership and someone registers for 3 tickets and adds Gold Membership for each ticket (ie. total of 3 Gold Membership) the discount code will apply for all 3 Gold Membership for a total discount of $30.
- Click here to learn how to allow attendees to register for break-out sessions.
- Click here to learn how to collect donations with each ticket.
- Click here to learn how to sell t-shirts and other items with each ticket.
Comments are closed.